
This trail is known as the “toughest backpacking route in Ontario”. Naturally, I had to test this statement. Over 4 days and 4 nights, I set out with two friends to hike La Cloche Silhouette Trail. Our 78km hike through the backcountry was as tough as it was rewarding. Evening swims, humid days, a fair few deer flies, panoramic views, and sunsets on the lake made for one grand adventure!
Where: Killarney Provincial Park, Ontario, Canada
When: May through September (hot and buggy in the middle of Summer, probably best in August and September)
Length: 78km loop (realistically 85km+ ) , 4-10 days (7 days recommended)
Hiking Trip Base Cost: $12/day for Backcountry Reservations, $12 Reservation Fee, $15-infinity/day for food = ~$200 to $400 for a 5 or 10 day trip
Additional Variable Costs: fuel for your stove, any new camping gear, a car rental, gas money, a flight, accommodation outside the park, beer, etc.
As always, remember to respect the Earth in your adventures. Here’s an honest approach with actionable steps you can take to be an awesome person who is helpful and responsible: How To Leave No Trace
La Cloche Silhouette Trail
Route Planning and Information
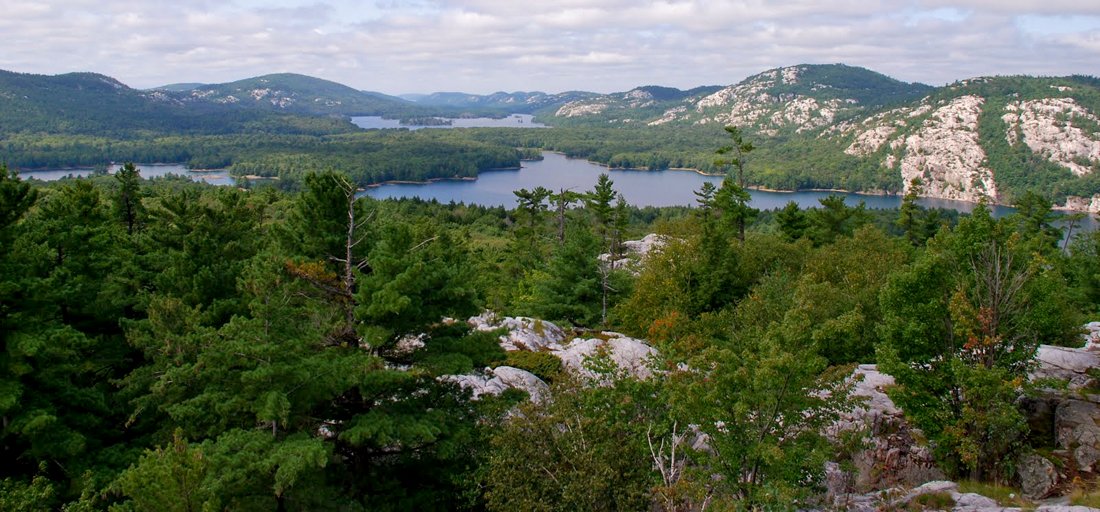
La Cloche Silhouette Trail is a backcountry hiking trail in Killarney Provincial Park. The trail and park is best known for its exposed quartzite and granite ridges, as well as crystal clear lakes that shine a bright aquamarine blue. Every blog, guide, magazine and source recommends 7-10 days for the trail, and anything under 5 days is considered high risk: you pay for your own rescue if needed. I was ambitious, and decided to plan for 4 nights on the trail. There were limited campsites left when I called to book a month in advance. Since you have to book campsites by the phone (call 1-888-668-7275) instead of online, it’s a good idea to have a map in front of you when you call. Jeff’s Killarney Map is what I used to plan, and I also bought the hard copy to take on the trail.
La Cloche Route Options
My itinerary does the loop in 4 days and 4 nights. Here are some other options if you are looking to spread it out (which I definitely recommend).
4 Nights, 4 Days
| 5 nights, 6 days
| 8 nights, 9 days
|
Itinerary for 4 Days on La Cloche Silhouette Trail
Day 1: George Lake Campground to H16, Three Narrows Lake (17km)
We really maximized our first day and started at 6am in Toronto. We arrived at Killarney 4 hours later. Due to the crazy forest fires in Northern Ontario, there was a complete fire ban. After showing the park ranger our stove, we were on our way!
Today is a shorter day at ~17km. From George Lake Campground, the trail follows rolling hills and young forests of birch, maple, white pine (my favourite) and some spruce trees. The trees are skinny and dense, and with the humidity it can feel like a bit of a jungle. Elevation changes aren’t terribly steep, but nearing the campsite they start to ramp up. Unfortunately, mid-July hits the mosquito season and deer fly season crossover in Ontario. Alas, the swampy beaver dam crossing combined with the dense forest made for a buggy start to the hike. A side trip to Topaz Lake (+2km) is certainly worth the views, and if you have time, it’s a great place for a swim and lunch!
H16 campsite is lovely, and is a perfect place to watch the sunset. We enjoyed a healthy portion of TVP Cous Cous, one of my all time favourite backpacking meals, and hit the hay.
Day 2: H16 to H31, Shigaug Lake (21km)
This section is one that can certainly be broken up into two days. Our Day 2 was unanimously the toughest day, and was the day where we all reached “Type 2 Fun“. The end of the day dragged on forever, and the campsite seemed to get further away with every step towards it. Fortunately, the saving grace was a long and leisurely swim in crystal clear waters at camp.
Today is where you realize why this route is classified as difficult. The granite and quartzite that covers the land is beautiful, but boy is it tough to climb up and down. On that note, do not underestimate Moose Pass! You go up and over many peaks that once stood higher than the Himalayas, and though you never get very high up the climbs are steep. There is a waterfall that you must ascend, and in any rain or wind this would have been much more tricky than it already was.
Campsites H31 and H32 are on Shigaug Lake. It’s a beautiful little oasis. H32 requires a bit more extra walking to get around to, but both are great sites. If you want to break this up into 2 days, you could spend the night at H21 for a 12km day. Another thing to note is to make sure you have enough water. Though there are many sources, you will drink a lot going up and down and quality sources are far between.
Day 3: H31 to H46, Bunnyrabbit Lake + Silver Peak (26km)
Today, you will climb to the highest point in the park – Silver Peak – and get that panoramic view you’ve been waiting for! Even though you cover the most distance, 4km are on the Silver Peak Trail without a pack. Whew! This is a really nice day with a lot of walking across rocky ridges and big, old growth forests that have lots of breathing room.
You will probably run into day hikers on the Silver Peak Trail. It’s about 2km one way from the junction of La Cloche Silhouette Trail to Silver Peak, but it’s easy compared to what you have just done. The trail never gets very steep, and you will be up in no time. Jeff of Jeff’s Maps estimates an hour, but without packs we were up in well under 45 minutes. In case you were unsure, the view is entirely worth the side trip!
After Silver Peak, the rest of the day flies by. We made it to H46 in plenty of time for our daily swim and an easy just-add-water backpacking meal.
Day 4: H46 to H53, Little Sheguiandah Lake (17km)
Home stretch!! The finish line is nearing. Today is a 17km hike to H53, which is less than 1km from George Lake Campground where you started. If you’ve made it this far, you could absolutely make it out on day 4 if you wanted to. We stayed an extra night to enjoy another swim on our private lake and an epic dinner.
Today is a great day, where you are rewarded with one more fantastic panoramic view. It’s the rocky and steep climbs for the first 10km, up to and including “The Crack”. The Crack Trail is another day hike that takes hikers up a very steep and rocky scramble to a viewpoint. If you’re hiking clockwise, you have to come down this steep section, so take your time and be careful – it’s a tricky section for sure.
After The Crack Trail, it’s smooth sailing to camp. Leaving the high rocky ridges behind, you hit the forest floor and skirt around countless stunning lakes. Descending into more old growth forest, the ecosystem changes again. Similar to the first day, the forests then become young and tightly packed again and the trail is wide as you near George Lake. It was like putting cruise control on for the second half of the day, and it felt amazing!
H53 on Little Sheguiandah Lake is picturesque. It features a rocky cliff on the opposite shore, lily pads on the water, and excellent rocks for taking a mid-afternoon nap.
Day 4.25: H53 to George Lake Campground (1km)
Depending on which end of the campground you parked you car, this could be a 700m day. Although short, there is one final climb before completing La Cloche Silhouette Trail. The trail ends in George Lake Campground, and an easy 1km stroll takes you back to your car.
Roses n Thorns
Rose (the best part)
Ontario lakes are awesome and swimming ROCKS! Killarney’s lakes are truly spectacular. The campsites were some of the best I’ve stayed at in Ontario, and a big part of that was the lakes. Knowing that each day you could look forward to a swim at the end of it all really kept us all motivated. The pristine freshwater and incredible colours were something I had not experienced on a backpacking trail, and had previously reserved for canoe trips only.
Thorn (the worst or most hilarious part)
I thought I had become tolerant and desensitized to bugs after 3 months of tree planting in northern Ontario in 2013. I thought wrong. Although the bugs were not as bad as they may have been in early July, it was still a bit of a bugger. I could really do without those pesky deer flies that follow you around all morning and take chunks out of you…
Bud (the new friend)
We didn’t pass too many other groups hiking the trail, but the ones we did were fantastic. On Day 3, we passed a Swedish couple who were hiking La Cloche Silhouette Trail in 10 days. They looked exhausted, but happy. We chatted about how much further they had to go, and how difficult they were finding it. The woman said that their Kilimanjaro climb in February wasn’t nearly as challenging as this trail was. It was a great reminder of my recent trip to Kilimanjaro, and the vast difference between the experiences. Honestly, I’d have to agree – each day on this trail is MUCH more challenging than each day on Kilimanjaro. Since this trip was local and came about in such a short period of time, I didn’t have any time to think about training or mental build up. It just kind of happened. And it was hard. Of course, the big factors here are the distances covered (at least double) and the weight carried (at least triple).
Gear and Food List
Gear
La Cloche Silhouette Trail is a proper backpacking route that requires a cook set and sleeping kit. Check out this extensive hiking gear list for a great place to start. Make sure you bring a map (Jeff’s Map of Killarney can be ordered/bought online). You are in bear country, so you’ll need a bear bag and rope to hang it.
Food
Here are some ideas: Food on the Trail. In general, my days look like this…
Breakfast: hot oats on short days, cold granola with milk powder on long days.
Lunch: snacks throughout the day including pepperoni sticks, tortillas, a LOT of peanut butter, granola bars, GORP, and dried fruit.
Dinner: prepared dehydrated meals when I’m feeling fancy, or deluxe instant noodles/Sidekicks when I’m not.
Make it Happen
- Understand the route and pick a time of year you want to go
- Choose your route/itinerary, and where you will stay each night so you can book your campsites. Again, this is done on the phone at 1-888-668-7275
- Once that is locked in, book your flights and/or transportation to the park
- If flying, fly into Toronto (YYZ) and rent a car from the airport to drive to Killarney.
- The fun begins! Plan your meals, get your gear in order, and start walking to work and taking the stairs to make your trip as enjoyable as possible
- Get outside and do the thing
Whether you are looking for more Escapes from Toronto or something else in Canada, get outside and go already!